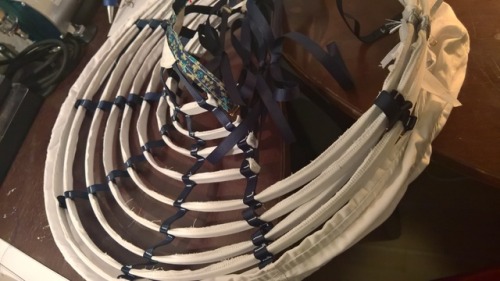
As promised, here are the pictures of my absolutely amazing miniaturized Elliptical Cage Crinoline. Two days of hard work paid off in the end!
I couldn't at all decide for 2-3 pictures to post out of the eight I shot so I'm feeling generous and are now sharing them all with you!
Next up on my to-do list will be the underwear; drawers, chemise, socks and corset.
-*-*-
Startup One Two
Elliptical Cage Crinoline One Two
Undergarments
Corset One Two Three
Petticoat
Main Skirt One Two
Jacket
Decor One Two Three
Jewellery
The odd ramble in between
Wig One Two Three Four
Shoes
Wedding Bouquet
Veil
Showing posts with label bjd crinoline. Show all posts
2017/12/11
Sewing Update!
All forgetting to post updates here, actually gotten the crinoline finished, all I need to do now is take some proper pictures to show it off owo
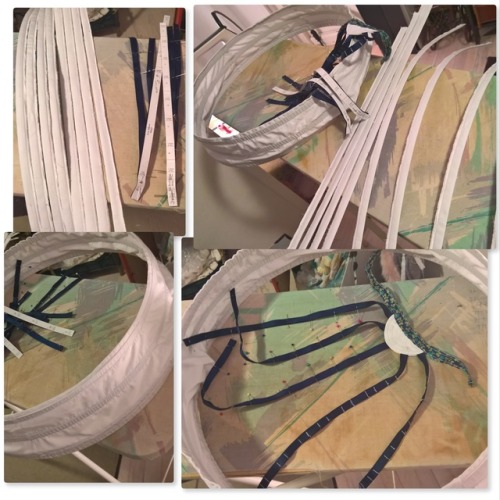
Yesterday I sat down and began sewing the bag and all of the channel tubing. Took ages sewing, but damn does that look nice!
Even got so far as to getting the first 4 steel wire hoops into the bag, started sewing slots in the vertical tape and finished the waistband (minus buckle).
So, today I went at it again with the vertical tape slots, holy crap there were many, 100+ tiny little ones, measuring just about 1cm across. Even with a sewing machine it took me a couple hours if not more, just for the slots alone.
Yesterday I sat down and began sewing the bag and all of the channel tubing. Took ages sewing, but damn does that look nice!
Even got so far as to getting the first 4 steel wire hoops into the bag, started sewing slots in the vertical tape and finished the waistband (minus buckle).
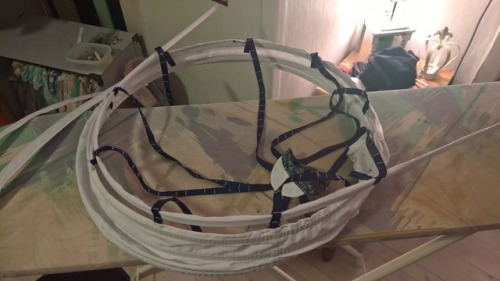
Having finished all of the slots, at long last, I could attach the vertical tape onto the bag, here I had already started pulling the hoops through the slots.
Every last hoop through the slots, the half hoops measured and tied (was that a hassle, didn't now the exact measurements of these, had to have the doll wear the crinoline while I had pulled some hoop pieces through the slots and measure where about I should make a cut for it to fit) and all missing in that picture was for the buckle and for the tape to be attached to the bag which I had forgot about in the meantime, that was until a needle pricked my finger xD
Going to shoot up some pictures tomorrow, it's too late and I'm too tired now for anything much.
-*-*-
Startup One Two
Elliptical Cage Crinoline One Two
Undergarments
Corset One Two Three
Petticoat
Main Skirt One Two
Jacket
Decor One Two Three
Jewellery
The odd ramble in between
Wig One Two Three Four
Shoes
Wedding Bouquet
Veil
Going to shoot up some pictures tomorrow, it's too late and I'm too tired now for anything much.
-*-*-
Startup One Two
Elliptical Cage Crinoline One Two
Undergarments
Corset One Two Three
Petticoat
Main Skirt One Two
Jacket
Decor One Two Three
Jewellery
The odd ramble in between
Wig One Two Three Four
Shoes
Wedding Bouquet
Veil
2016/02/03
Wedding Dress - Finished Crinoline and Corset WIP
Finally finished sewing the crinoline here the other day. Had been my intentions to shoot pictures yesterday but it was so grey and dark outside that I dismissed it entirely and spent the day getting kips put in Riku's joints along with his spouse, Matthew. Made it quite a joy shooting these pictures really. But here they are, pictures of a project that's taken well over 12 hours to complete. Looks easy enough putting together, but it's not. Takes a lot longer than you'd expect and I have this awful habit of underestimating how long some things will actually get to take.
The crinoline, while it isn't entirely perfect and could have been sewn a lot better, I'm pretty satisfied. Never made a crinoline like this before so for a first this isn't all bad. Next time I will just be using a different type of fabric for the piping as the one I used went and unexpectedly got all stretchy on me. Guess it didn't do well getting cut into thin strips. Also the top 4 half hoops could have been positioned better. Perhaps next time I should work on this crinoline around a mannequin to get things just the way they're supposed to. Again, I'm satisfied and for a first I don't think I'd be able to make it any better than this. Good thing it's to be covered by a petticoat, huh? Nah, just kidding, could have looked like a trainwreck and it doesn't.
Which brings us on to the next garment in line to be made:
The Corset
Posted a picture yesterday of the pieces cut out and here I've put them all together with pins. It will get to look so very nice with that print and gorgeous dark blue lining. Have yet to cut out some fabric for the modesty panel and the modesty placket but I will get there. Thinking I will have to go buy some much thinner satin ribbon seen as the ribbon I have here is far too thick and I only have black. There wont be doing much of any decoration on this, going to be keeping it really simple. Just some lace at the top and that'll be it. It's a shame the snap clasps for the busk hasn't arrived in the mail yet, then I'd be able to finish it in its entirety. For now I will simply sew as much of it as possible.
Subscribe to:
Posts (Atom)
-
When the first rolls around I will be going on quite a shopping spree. First off, I will pay for some clothing's I've had on hold b...
-
27) Do you have a favourite out of your own dolls? Nah, we don’t play that card ‘round here
-
When I saw this little guy on the local forum, at first I told myself no, that I had plans and should stick to them. Sure, stick to them, m...